
Riding a motorcycle is thrilling. Communication on the road is vital for safety.
Motorcycle hand signals play a crucial role in ensuring clear communication with other riders and drivers. These signals are easy to learn but can make a big difference in preventing accidents. By using hand signals, you can alert others to your intentions, such as turning or stopping, without relying on electronic signals.
This is especially important if your bike’s lights fail. Knowing these hand signals is essential for every rider, whether you are a beginner or an experienced motorcyclist. In this post, we will explore the key motorcycle hand signals every rider should know. Understanding these can enhance your riding experience and keep you safer on the road.
Credit: www.motorcyclelegalfoundation.com
Importance Of Hand Signals
Motorcycle hand signals are essential tools for riders. They convey important messages and enhance safety on the road. Understanding the importance of hand signals can significantly improve your riding experience. They help in avoiding accidents and ensure smooth communication with other riders.
Safety On The Road
Road safety for bikers is crucial. Using visual signals for motorcyclists helps in preventing accidents. Hand signals for bikers are a way to inform others about your intentions. This reduces the chances of misunderstandings and collisions.
Here are some common motorcycle signaling techniques:
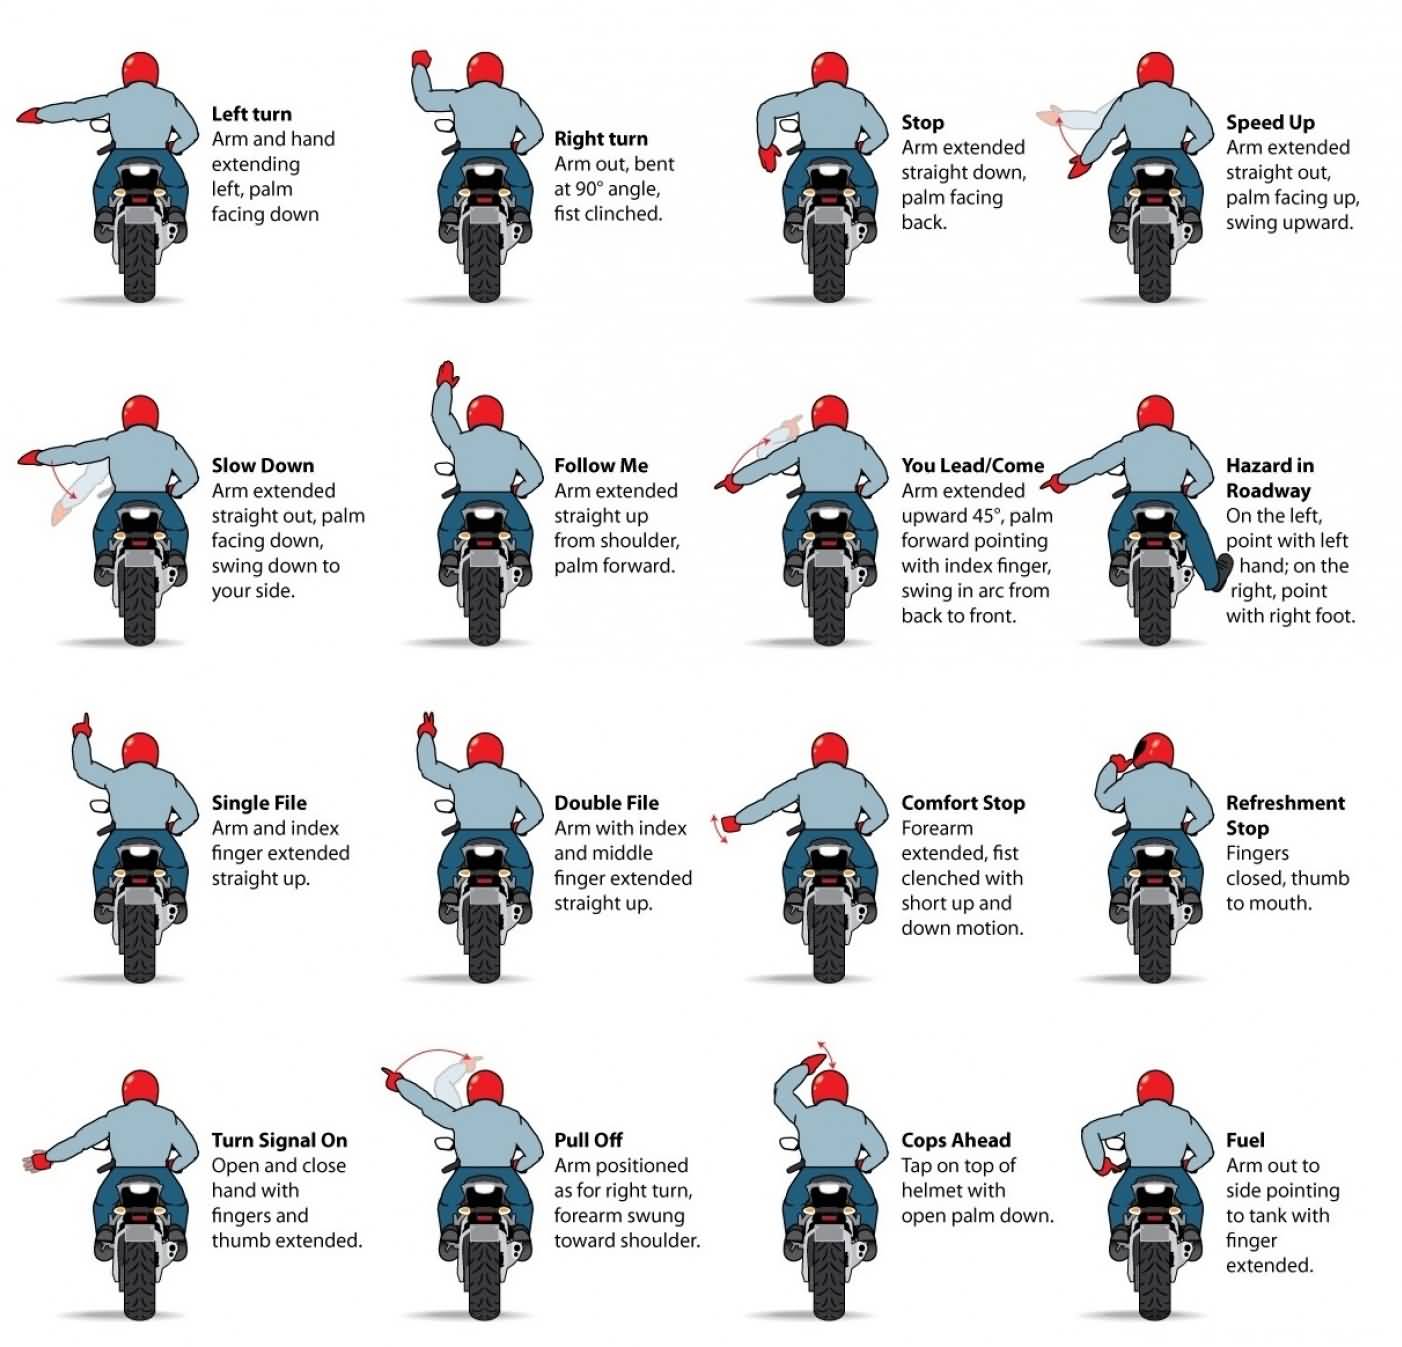
- Left Turn: Extend your left arm straight out.
- Right Turn: Extend your left arm out, bent at 90 degrees upward.
- Stop: Extend your left arm out, bent at 90 degrees downward.
Using these signals correctly is a part of safe riding practices. They are especially important in areas with heavy traffic. Making your intentions clear can save lives.
Consider the following table for quick reference:
| Signal | Description |
|---|---|
| Left Turn | Left arm straight out |
| Right Turn | Left arm bent upwards |
| Stop | Left arm bent downwards |
Following these motorcycle riding tips ensures not just your safety, but also that of others on the road. In group riding, these signals become even more vital. They help maintain order and prevent accidents. Always be vigilant and use hand signals as needed.
Communication With Riders
Effective rider communication is key to a successful ride. Hand signals for bikers play a significant role here. They help in conveying messages clearly. In motorcycle group riding, communication is essential to keep everyone in sync.
Here are some signals used in group riding:
- Speed Up: Left arm moving up and down.
- Slow Down: Left arm moving up and down, with palm facing downwards.
- Single File: Left hand raised with index finger pointing up.
- Double File: Left hand raised with index and middle fingers pointing up.
Using these signals improves biker etiquette. It ensures everyone knows what to do. It minimizes confusion and keeps the group together.
Consider this table for quick reference:
| Signal | Description |
|---|---|
| Speed Up | Left arm moving up and down |
| Slow Down | Left arm moving up and down, palm facing downwards |
| Single File | Left hand raised, index finger pointing up |
| Double File | Left hand raised, index and middle fingers pointing up |
These signals are part of motorcycle safety. They keep everyone informed and aware. Always practice these signals for effective rider communication. It makes the ride enjoyable and safe for everyone involved.

Credit: www.eaglerider.com
Basic Hand Signals
Motorcycle hand signals are vital for safe riding. They help communicate with other riders and drivers. Basic hand signals ensure everyone knows your next move. This enhances motorcycle safety and road communication. Understanding these signals is key to visibility on the road and safe riding practices.
Left Turn Signal
The left turn signal is simple yet crucial. To signal a left turn, extend your left arm straight out from your body. This clear gesture indicates your intent to turn left. Motorcycle hand gestures like this ensure others know your direction.
Here are the steps for the left turn signal:
- Check your mirrors.
- Extend your left arm straight out.
- Maintain the signal until you complete the turn.
Keeping your left arm steady and visible is important. This signal works well in various lighting conditions. It also helps in heavy traffic. Consistent use of the left turn signal can prevent accidents. It shows your commitment to riding etiquette and motorcycle safety.
Below is a table summarizing the left turn signal:
| Action | Description |
|---|---|
| Extend Left Arm | Hold your left arm straight out from your body. |
| Check Mirrors | Ensure it is safe to turn. |
| Maintain Signal | Keep your arm extended until the turn is complete. |
Right Turn Signal
The right turn signal is equally important. Extend your left arm, bending it at the elbow so your hand points up. This hand signal clearly shows a right turn. Motorcycle hand gestures like this are easy to understand and widely recognized.
Here is how to perform the right turn signal:
- Check your mirrors.
- Bend your left arm at a 90-degree angle with your hand pointing up.
- Hold the position until the turn is complete.
Ensuring your signal is clear and visible is crucial. Turn signaling helps others anticipate your moves. This reduces the risk of accidents. It’s a core part of safe riding practices. The right turn signal is especially useful in busy areas. It shows your intent clearly, improving road communication.
Below is a table summarizing the right turn signal:
| Action | Description |
|---|---|
| Bend Left Arm | Bend your left arm at a 90-degree angle with your hand pointing up. |
| Check Mirrors | Ensure it is safe to turn. |
| Maintain Signal | Keep your arm in position until the turn is complete. |
Stopping Signals
Motorcycle hand signals are crucial for safe riding and effective traffic communication. Understanding and using these signals can prevent accidents and ensure smooth rides. Among these, stopping signals are vital for indicating when you’re slowing down or coming to a stop. Mastering these signals is a key part of motorcycle riding techniques and biker etiquette.
Slow Down
When you need to reduce speed, the slow down hand signal is essential for alerting other riders and drivers. This signal is straightforward but highly effective in maintaining road awareness and ensuring motorcycle safety.
To perform the slow down signal:
- Extend your left arm out to the side.
- Keep your palm facing down.
- Move your arm up and down in a gentle wave.
This motion is a clear visual signal for bikers behind you. It tells them to reduce speed. This is especially useful in heavy traffic or when approaching a hazard on the road. Using this signal as part of your riding signals helps in maintaining a safe distance between vehicles.
There are several motorcycle safety tips to remember:
- Always check your mirrors before signaling.
- Ensure your signal is clear and visible.
- Practice this signal regularly for better communication.
Motorcycling best practices include using hand signals in conjunction with brake lights. This double indication ensures that both bikers and drivers are aware of your intentions. Effective use of the slow down signal can significantly improve traffic communication and prevent accidents.
Come To A Stop
The come to a stop hand signal is another crucial visual signal for bikers. It indicates that you are about to halt your motorcycle. This signal is particularly important in heavy traffic or group rides, enhancing overall motorcycle safety.
To perform the come to a stop signal:
- Extend your left arm out to the side.
- Keep your palm open and fingers together.
- Point your hand down towards the ground.
This signal clearly communicates your intention to stop. It helps other riders and drivers prepare to slow down and stop as well. Using this signal is part of effective motorcycle riding techniques and enhances road awareness.
Here are a few motorcycle safety tips for using the come to a stop signal:
- Signal well before you intend to stop.
- Ensure your signal is visible to both riders and drivers behind you.
- Combine this signal with your brake lights for maximum visibility.
Proper use of this hand signal is part of biker etiquette. It shows respect for other road users and contributes to safer riding conditions. Consistently using the come to a stop signal can greatly enhance traffic communication and reduce the risk of rear-end collisions.
Both slow down and come to a stop signals are fundamental motorcycling best practices. They ensure effective communication and safety on the road. By integrating these hand signal meanings into your riding habits, you can significantly improve your safety and that of others on the road.
Credit: haustrom.com
Emergency Signals
Motorcycle hand signals are crucial for safe riding and effective communication on the road. Understanding emergency signals can prevent accidents and ensure that everyone in the group is aware of potential dangers. This section focuses on two vital emergency signals: Hazard Warning and Need Assistance.
Hazard Warning
Recognizing and using the Hazard Warning signal is essential for Motorcycle Safety. When a rider spots a hazard, they can alert the group using specific hand gestures. This ensures everyone is prepared to navigate safely around the obstacle.
Here are some common situations that may require a hazard warning:
- Debris on the road
- Sudden stops or slow traffic
- Animals crossing the road
- Potholes or uneven surfaces
To signal a hazard, extend your left arm out and point down towards the road. Move your hand in a back-and-forth motion to indicate the direction and location of the hazard. This Hand Gesture Signal is simple but effective in keeping everyone alert and safe.
In group rides, Riding Communication is vital. Make sure everyone understands this signal before starting your ride. Practice the gesture so it becomes second nature. Clear and consistent signals can prevent misunderstandings and accidents.
Using these Traffic Signals For Bikers enhances Road Awareness and promotes safer riding experiences. Always be vigilant and ready to use the hazard warning signal to protect yourself and fellow riders.
Need Assistance
Another critical Emergency Signal For Motorcyclists is the Need Assistance signal. This hand gesture is used to communicate that a rider needs help, whether due to a mechanical issue, injury, or any other emergency.
To signal for assistance, raise your left arm straight up with an open palm. This universal gesture alerts other riders that you require immediate help. Make sure to pull over safely to the side of the road before signaling.
Here are some reasons a rider might need assistance:
- Mechanical breakdown
- Flat tire
- Running out of fuel
- Medical emergency
In a Motorcycle Group Riding scenario, it is important to designate a lead and a sweep rider. The lead rider can relay the assistance signal to the rest of the group, while the sweep rider ensures no one is left behind.
Proper Riding Communication includes knowing how to respond to an assistance signal. If you see this signal, safely pull over and assess the situation. Offer help or call for professional assistance if needed.
Integrating these Motorcycle Safety Signals into your riding routine can make a significant difference. They enhance Motorcycle Safety and ensure everyone can enjoy a safer ride. Always stay alert and ready to use the need assistance signal when necessary.
Group Riding Signals
Riding in a group can be a fun and exciting experience. It requires good communication to ensure safety and coordination among riders. Group Riding Signals are essential for maintaining order and preventing accidents. These signals include hand gestures that convey important messages to fellow riders. Understanding and using these signals can make group rides smoother and more enjoyable.
Formation Changes
Formation changes are crucial for maintaining order and safety during group rides. Formation Riding ensures all riders follow a structured pattern, making it easier to navigate through traffic and turns. Here are some common hand gestures for formation changes:
- Single File Formation: Extend your left hand above your head and point your index finger straight up. This signal indicates that the group should switch to a single file formation, often used in narrow or winding roads.
- Staggered Formation: Raise your left hand with your index and middle fingers extended upward, forming a V-shape. This signal is used for a staggered formation, providing better visibility and space for each rider.
- Double File Formation: Extend your left hand upward with two fingers spread apart. This indicates a double file formation, suitable for wide and straight roads.
Using these Visual Signals For Motorcyclists ensures everyone in the group understands the formation changes. It helps in maintaining a safe distance and organized structure, especially during turns and lane splits.
| Signal | Gesture | When to Use |
|---|---|---|
| Single File | Left hand above head, index finger up | Narrow or winding roads |
| Staggered | Left hand up, index and middle fingers in V-shape | Normal traffic conditions |
| Double File | Left hand up, two fingers spread apart | Wide, straight roads |
Lane Changes
Lane changes require clear and concise signals to ensure the group moves together safely. Lane Change Signals are vital for communicating the intention to switch lanes, preventing confusion and accidents. Here are some essential hand gestures for lane changes:
- Left Lane Change: Extend your left arm straight out to the side. This indicates that the group will move to the left lane.
- Right Lane Change: Bend your left arm at a 90-degree angle and point your hand up. This signals the group to move to the right lane.
- Hazard on the Left: Point to the ground on your left side with your left hand. This warns the group of a hazard on the left side of the road.
- Hazard on the Right: Point to the ground on your right side with your right foot or hand. This warns the group of a hazard on the right side of the road.
These Motorcycle Safety Signals help in maintaining a smooth flow of movement within the group. They ensure every rider is aware of the lane change and potential hazards. Effective Motorcycle Communication through these signals can prevent misunderstandings and keep the group ride enjoyable and safe.
Remember, consistent use of Biker Hand Signals can greatly enhance the safety and coordination of group rides. Practice these signals regularly to ensure all group members are familiar with them.
Regional Variations
Motorcycle hand signals are vital for safe riding. They help communicate intentions and ensure safety on the road. Yet, these signals can vary significantly by region. Understanding these regional variations is crucial for all riders. It enhances communication and improves motorcycle safety across different areas.
Different Countries
Motorcycle hand signals can differ from one country to another. Knowing these differences is essential for international riders. Here are some examples:
- United States: In the U.S., riders use clear and standardized hand signals. Common signals include the left arm extended straight out for a left turn. A bent left arm with the hand pointing up indicates a right turn.
- United Kingdom: In the UK, the right arm is often used for signals. A straight right arm signals a right turn, while a bent right arm with the hand pointing up means a left turn.
- Germany: German riders follow similar signals to the U.S. However, they may also use more specific gestures. For example, tapping the top of the helmet can mean “police ahead.”
Here’s a quick comparison table for easy reference:
| Country | Left Turn | Right Turn | Stop |
|---|---|---|---|
| United States | Left arm straight out | Left arm bent up | Left arm bent down |
| United Kingdom | Right arm bent up | Right arm straight out | Right arm bent down |
| Germany | Left arm straight out | Left arm bent up | Left arm bent down |
Local Customs
Local customs also influence motorcycle hand signals. Riders in different regions may develop unique gestures. Understanding these customs enhances the riding experience and ensures safety. Here are some examples:
- Italy: Italian riders often use more expressive gestures. A quick wave or nod can indicate a friendly greeting. Pointing to the ground may signal a road hazard.
- Japan: Japanese riders use subtle and polite signals. A small wave can indicate thanks. Flashing the brake light can signal a stop.
- India: In India, riders use a mix of hand signals and horn honks. Pointing to the side may signal a turn. A quick honk can indicate overtaking.
Local customs can also vary within a country. Urban areas might have different signals compared to rural regions. Here are some additional local customs to consider:
- Urban Areas: Riders may use more hand signals due to heavy traffic. Visual communication becomes crucial in crowded streets.
- Rural Areas: In rural regions, riders might rely more on headlight flashes. This can signal intentions over longer distances.
Understanding these local customs and regional variations in riding gestures is key. It helps in better communication signals and improves overall motorcycle riding etiquette. Stay aware of these differences to enhance road safety tips for all bikers.
Common Mistakes
Motorcycle hand signals are crucial for safe riding, especially in group rides or heavy traffic. Yet, many riders make common mistakes that can lead to accidents or misunderstandings. Below, we explore these errors and how to avoid them, ensuring a safer ride for everyone.
Misinterpretation
Misinterpreting hand signals is a frequent issue among motorcyclists. This usually happens when riders are not familiar with standard signaling techniques or make assumptions about the signals given by other riders. Misinterpretation can lead to dangerous situations.
Consider these points to avoid misinterpretation:
- Ensure you know the basic hand signals for turns, stops, and other maneuvers.
- Communicate clearly and consistently with your hand gestures.
- Practice motorcycle communication within your group to ensure everyone understands the signals.
Another common cause of misinterpretation is poor visibility. Wearing dark gloves or signaling in low-light conditions can make it hard for others to see your signals.
Use these tips to improve visibility:
- Wear bright or reflective gloves.
- Signal early to give others time to react.
- Make your gestures large and obvious.
Using proper visual signals is essential for motorcycle safety tips. It helps in preventing confusion and accidents, keeping all riders aware and safe.
Failure To Signal
Failing to signal is another common mistake that can lead to dangerous situations. Whether you’re riding alone or in a group, signaling your intentions is crucial for riding safety.
Here are some reasons why riders might fail to signal:
- Forgetting to signal due to inexperience or distraction.
- Assuming that other riders or drivers will understand their actions without signals.
- Not knowing the correct group riding signals.
Failure to signal can confuse other riders and drivers, increasing the risk of accidents. To avoid this, make signaling a habit. Always use the correct hand gestures for turns, stops, and lane changes.
Consider these strategies to improve your signaling habits:
- Regularly practice hand signals to make them second nature.
- During group riding, ensure everyone knows and uses the same signals.
- Encourage fellow riders to signal properly by setting a good example.
By consistently using traffic signals and hand gestures, you enhance road awareness and contribute to safer biker etiquette.
Practicing Hand Signals
Motorcycle hand signals are crucial for effective communication while riding. Practicing hand signals ensures safety and clear communication between riders. Whether riding solo or in a group, understanding and using these signals can prevent accidents and enhance your riding experience.
Solo Practice
Practicing hand signals on your own is the first step to becoming proficient in Motorcycle Riding Techniques. Start in a quiet, open area where you can focus on your movements without distractions. Below are some tips for solo practice:
- Learn the Basic Signals: Begin with the most common hand signals such as left turn, right turn, stop, and slow down. These are fundamental for any rider.
- Practice in a Safe Environment: Choose a parking lot or an empty road to practice. Ensure you are away from traffic to avoid any potential hazards.
- Use Mirrors: While practicing, use your mirrors to check the effectiveness of your signals. This helps you understand how visible your hand gestures are to others.
- Repeat Regularly: Consistency is key. Regular practice will make these signals second nature, improving your Motorcycle Safety.
Here’s a table of basic hand signals for solo practice:
| Signal | Hand Gesture |
|---|---|
| Left Turn | Left arm extended straight out |
| Right Turn | Left arm bent at a 90-degree angle upwards |
| Stop | Left arm bent at a 90-degree angle downwards |
| Slow Down | Left arm extended downwards, palm facing back |
Group Practice
Group riding introduces additional hand signals to ensure all riders are on the same page. Practicing in a group setting is essential for effective Riding Communication and Motorcycle Riding Etiquette. Here’s how to practice in a group:
- Form a Small Group: Start with a small group of trusted riders. This makes it easier to coordinate and correct any mistakes.
- Designate a Lead Rider: The lead rider communicates changes in speed, direction, and hazards. Other riders should follow these signals closely.
- Practice Common Group Signals: Learn signals such as single file, double file, and road hazard. These are critical for Group Riding Signals.
- Conduct Mock Rides: Organize practice rides in a controlled environment. This helps in familiarizing with Biker Signals and Hand Gestures For Motorcyclists.
- Communicate Post-Ride: Discuss the practice session. Feedback helps improve Effective Communication While Riding.
Below is a table of essential group riding signals:
| Signal | Hand Gesture |
|---|---|
| Single File | Left hand up with one finger raised |
| Double File | Left hand up with two fingers raised |
| Road Hazard Left | Left hand pointing down to the left |
| Road Hazard Right | Right foot pointing down to the right |
Frequently Asked Questions
What Are Common Motorcycle Hand Signals?
Motorcycle hand signals are gestures used by riders to communicate with others on the road. They include signals for turning, stopping, and slowing down. These signals ensure safety and coordination among motorcyclists and other vehicles.
Why Use Motorcycle Hand Signals?
Motorcycle hand signals are crucial for road safety. They help communicate intentions to other riders and drivers. This reduces accidents and misunderstandings. Hand signals are especially important when riding in groups or when turn signals aren’t visible.
How To Signal A Left Turn?
To signal a left turn, extend your left arm horizontally. Keep it straight and parallel to the ground. This gesture informs others that you intend to make a left turn.
What Is The Signal For Stopping?
To signal a stop, extend your left arm downward. Keep your palm open and facing backward. This indicates to others that you are slowing down or stopping.
Conclusion
Understanding motorcycle hand signals enhances your safety on the road. They communicate intentions clearly to fellow riders and drivers. Practice these signals regularly. They become second nature over time. Safe riding habits prevent accidents and save lives. Start using these signals in your daily rides.
Enjoy smoother and safer journeys. Remember, clear communication is key. Stay alert and ride safely.

Rakib Sarwar is an experienced blogger and avid automotive enthusiast with a passion for both cars and motorcycles. With years of industry knowledge, he covers everything from in-depth vehicle and bike reviews to the latest trends, maintenance tips, and cutting-edge technology. Rakib’s blog has become a trusted resource for readers who share his love for all things on wheels, offering them engaging and reliable content that fuels their automotive interests.