Most motorcycle scratches don’t happen on the road. They happen in the driveway, during washing, with the wrong cloth or too much pressure. It’s one of those things nobody warns you about until the damage is already done.
This guide walks you through exactly how to wash your motorcycle without scratching the paint — using simple tools, the right order, and techniques that actually protect your finish long-term.
Why Washing Incorrectly Damages Motorcycle Paint
Washing a motorcycle without scratching the paint requires pre-rinsing to remove debris, using a microfiber mitt with pH-neutral soap, following a two-bucket method, and drying immediately with a clean microfiber towel. Avoid sponges, harsh pressure, and direct sunlight to prevent swirl marks and paint damage.
Paint damage during washing usually comes down to a few avoidable mistakes—mainly dragging dirt across the surface, reusing contaminated water, or applying too much pressure while scrubbing.
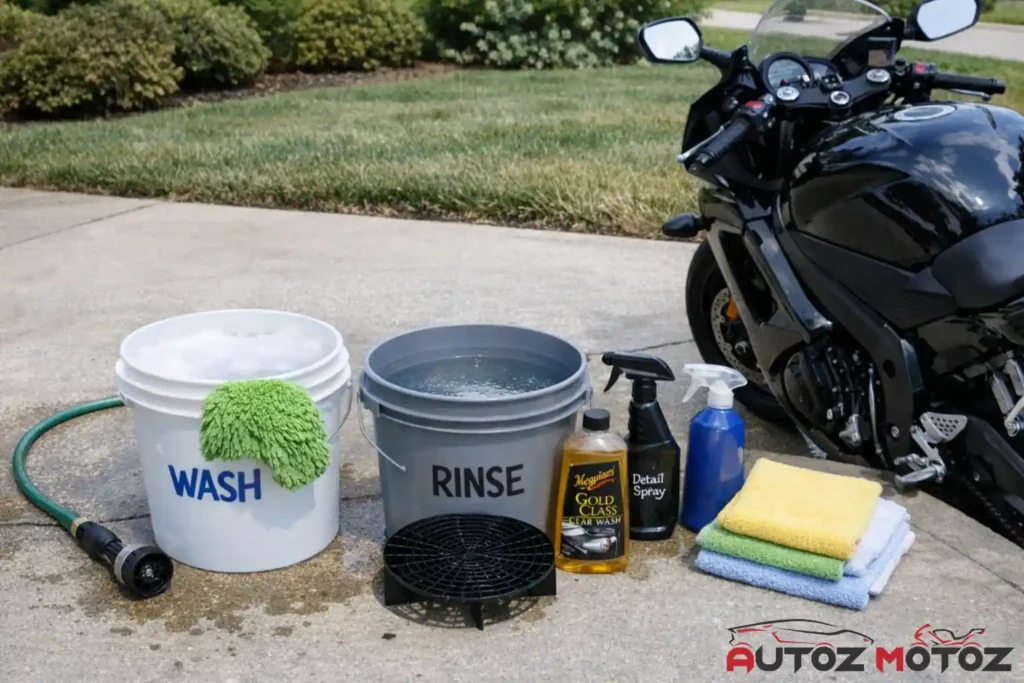
What You Need Before You Start
The setup matters more than most people expect—this is where most paint damage actually starts.
Most riders overcomplicate this part. In reality, you only need a few things done right—and a couple of mistakes avoided.
Washing essentials:
- Two buckets — one for clean soapy water, one for rinsing your mitt.
- A microfiber wash mitt — never a sponge or dish cloth.
- pH-neutral vehicle wash soap — not dish soap, not all-purpose cleaner.
- A garden hose with a gentle spray setting or a low-pressure washer.
- Separate microfiber towels for drying.
Optional but worth having:
- A dirt trap or grit guard insert for your rinse bucket
- A detailing spray for a final wipe-down
- Separate mitts for wheels and bodywork — wheels carry brake dust and grease that you do not want near your paint
If you’re still figuring out which products to buy, our guide to the best motorcycle cleaning tools breaks down what actually matters versus what’s just marketing.
Step 1: Park in Shade and Let the Engine Cool
- Never wash a hot engine. Heat causes soap to dry faster than you can rinse it, leaving residue and water spots baked onto the surface. Find a shaded spot and give the bike at least 20 minutes after a ride.
- Direct sunlight does the same thing — it accelerates drying and makes rinsing nearly impossible to keep up with. Overcast days or early morning are ideal.
Step 2: Pre-Rinse the Entire Bike
- Before any soap touches the motorcycle, rinse it thoroughly with water. This lifts off loose dust, sand, and road debris — the particles that do the most scratching when you start scrubbing.
- The upper surfaces — handlebars, tank, seat — carry less grime than the lower sections near the wheels and exhaust. Rinsing top to bottom keeps the dirtiest water flowing away from areas you’ve already cleaned. You may check our best recommendation for your
- Keep water pressure low around electrical components, the air filter, and instrument clusters. A gentle garden hose is safer than a jet washer at close range.
If you’re upgrading accessories, choosing the best motorcycle handlebar speakers setup also affects how easy the bike is to clean.
Step 3: Apply Soap and Wash With a Microfiber Mitt
- Mix your vehicle soap into the clean bucket according to the product ratio. Do not use dish soap — it strips protective wax and leaves paint dull over time, regardless of how well it cleans.
- Soak your microfiber mitt in the soapy water and start washing from the top down, using long, straight strokes. Circular motions are more likely to leave swirl marks. Straight lines are safer.
- Use light, consistent pressure. More pressure does not equal more clean. Pressure grinds particles into the paint. The soap does the lifting — let it.
- Work in small sections: tank, fairings, seat area, lower frame, wheels last.
Step 4: Rinse Your Mitt in the Second Bucket Before Every Reload
- Every time you dip your mitt back into the wash bucket without rinsing it first, you transfer the dirt you just removed right back into your clean soapy water. That dirty water then goes straight onto your paint.
- Use the second bucket — the plain water bucket — to rinse your mitt before dipping it into soap again. If you have a grit guard insert sitting at the bottom of your rinse bucket, it traps debris below the water line so it doesn’t get picked up again. Small detail, big difference over time.
Step 5: Rinse Thoroughly
- Once you’ve washed the full bike, rinse everything off completely. Any soap left on the surface will dry into a filmy residue, especially in warm temperatures.
- Again, top to bottom. Make sure you clear soap out of panel gaps, around mirrors, and under the seat edge where water tends to sit.
If you’re upgrading accessories, choosing the right handlebar setup also affects how easy the bike is to clean – best motorcycle mirrors.
Step 6: Dry Immediately With a Clean Microfiber Towel
- Water left to air dry leaves mineral deposits — those white spots you see on dark paint. Dry the bike as soon as the rinse is done.
- Use a clean, dry microfiber towel and blot or drag gently — do not rub hard. Keep separate towels for the bodywork versus the wheels and exhaust. Cross-contamination from wheel towels is a common source of fine scratches on paint.
Common Mistakes That Scratch Motorcycle Paint
Such mistakes are common and repetitive, yet they can be easily avoided with proper awareness and attention.
Using dish soap or household cleaners. These are formulated to cut grease aggressively. They also strip protective wax and leave paint exposed.
Washing with a sponge. Sponges trap grit against a flat surface and drag it across paint with every stroke. A microfiber mitt lifts dirt away instead.
One-bucket washing. Without a separate rinse bucket, you’re washing the bike with progressively dirtier water the entire time.
Dropping the mitt and continuing to use it. The moment a mitt hits the ground, it picks up grit. Set it aside and grab a clean one.
Using high-pressure water near seals and electronics. It forces water into places it shouldn’t go and can cause longer-term electrical issues.
Washing in direct sunlight. Soap dries too fast to rinse properly, and water spots form before you can prevent them.
How Often Should You Wash Your Motorcycle?
For regular riders in the US, once every two to four weeks is a reasonable baseline — more often if you’re riding in rain, near coastal salt air, or through heavy traffic that throws up road grime. Before a long trip you may check our best motorcycle tent for safe and comfort journey experience. After a long trip or a wet ride, wash within a day or two to prevent corrosion on exposed metal and brake components.
Does Washing Your Motorcycle Affect Its Resale Value?
Yes — significantly. Paint condition is one of the first things a buyer looks at, and swirl marks from improper washing are visible in sunlight even to an untrained eye. A motorcycle with clean, unmarked paint signals that the owner took care of it overall, which supports a higher asking price and a faster sale.
Related : can-too-much-oil-cause-clutch-slip-motorcycle
Frequently Asked Questions
Q: Can I use pressure washer on my motorcycle?
A: Yes, but with caution. Keep the pressure low — under 1,200 PSI — and maintain at least 12 inches of distance from the surface. Avoid directing water at the air filter, electrical connectors, wheel bearings, and fork seals.
Q: What soap is safe for motorcycle paint?
A: Use a pH-neutral soap specifically designed for vehicles. Brands like Meguiar’s Gold Class, Chemical Guys Citrus Wash, or Mothers California Gold are widely used and considered safe for factory paint and clear coat.
Q: Is it okay to wash a motorcycle in cold weather?
A: Yes. In cold conditions, dry the bike thoroughly before storage to prevent moisture from sitting on metal surfaces.
Q: Can I use leaf blower to dry my motorcycle?
A: Yes — many detailers use a leaf blower or dedicated car dryer to push water out of tight spaces before towel drying. It reduces the amount of towel contact needed, which lowers scratch risk.
Q: How do I remove water spots that are already there?
A: A dedicated water spot remover or a light polish applied with a microfiber applicator will address most mineral deposits without damaging clear coat. Avoid abrasive compounds on painted surfaces.
Conclusion
Washing a motorcycle without scratching it comes down to a few consistent habits: rinse before you scrub, use the right tools, keep your wash water clean, and let the soap do the work instead of applying pressure.
Washing a motorcycle properly isn’t about effort—it’s about method. Once you get the process right, it becomes quick, repeatable, and far less risky for your paint.
Technical precision in motorcycles, cars, and automotive gear is established by Nahid Hassan through rigorous evaluation. Performance-driven reviews and high-value affiliate insights are consistently curated at AutoZMotoZ to ensure reader trust. Absolute integrity is maintained in every analysis, with a focus on original and human-verified data.